Reaching out to customers through personalized communication is a key aspect of achieving long-term relationships with clients. MoEngage is a customer engagement system that allows companies to send the right push messages, emails, and in-app communications on the basis of users’ behavior. It allows teams to create relevant communication opportunities based on the activities of their clients.
When MoEngage is connected to Apptrove, it simplifies the exchange of the data connected to installations between the two systems. Instead of performing manual data exchange, now with MoEngage connecting Apptrove transfers the data needed to the MoEngage automatically keeping both systems up to date.
This connection allows marketing teams to spend less time on managing data transfers and to concentrate on their campaigns.
The Royce process of starting a MoEngage connection requires an active MoEngage account and some credentials. When they are collected in Apptrove and set up correctly, post backs can be activated.
Prerequisites for MoEngage Integration
Before you make any configuration on integrating MoEngage, please ensure you have access to the necessary account information and login details. These credentials will help in establishing the connection between Apptrove and your MoEngage workspace.
You will need:
- Active MoEngage account: To access the necessary integration credentials, it would be great if you have an active account.
- Attribution Key (App Key): This key is required to identify the application linked to your MoEngage account.
- Workspace ID (App ID): To set the link, you need this workspace identifier.
- API Key: This is the login credential needed in setting up the integration.
- Data Centre region: You need the Data Centre region of your MoEngage account.
Confirm that you have collected these before you set out to configure. Having the needed information at your fingertips will ease MoEngage setup integration.
Integrating Apptrove with MoEngage
Connecting MoEngage to Apptrove is a matter of finding the platform in the integration directory, entering your credentials, enabling default postback, and saving the configuration.
Here are the steps under this section to complete the setup:
Step 1: Locate MoEngage in the Integration Directory
Begin by logging into your Apptrove account with your login information.
When you are on the dashboard, navigate to Partners Integration > Directory. This section must show integration options you can set up in Apptrove.
In the search box located in the directory section, search for MoEngage. The system will display the platform in the list of available integrations.
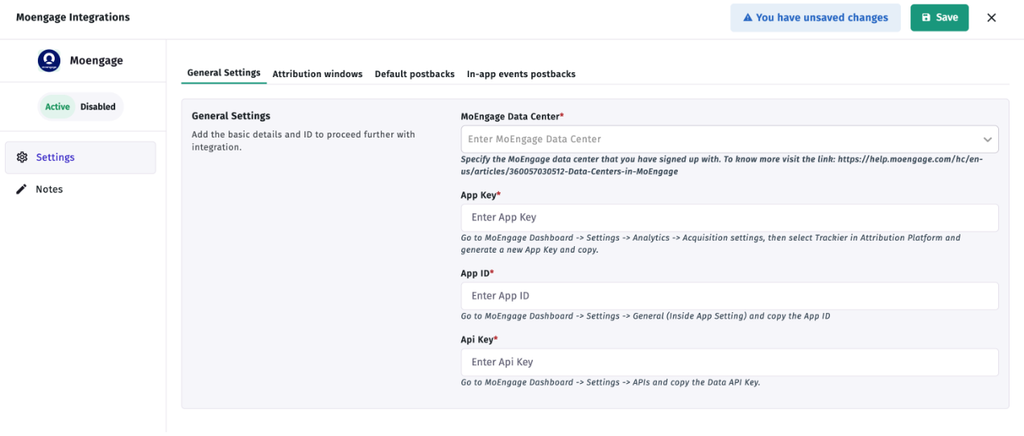
Click on the MoEngage platform to access the configuration page.
This stage lets you enter account details and set up settings to integrate with MoEngage.
Step 2: Enter Your MoEngage account information
Once you have accessed the MoEngage configuration window, the next step will be to input your MoEngage account details into the interface.
For the connection to work, Apptrove needs three significant credentials.
Attribution Key (App Key)
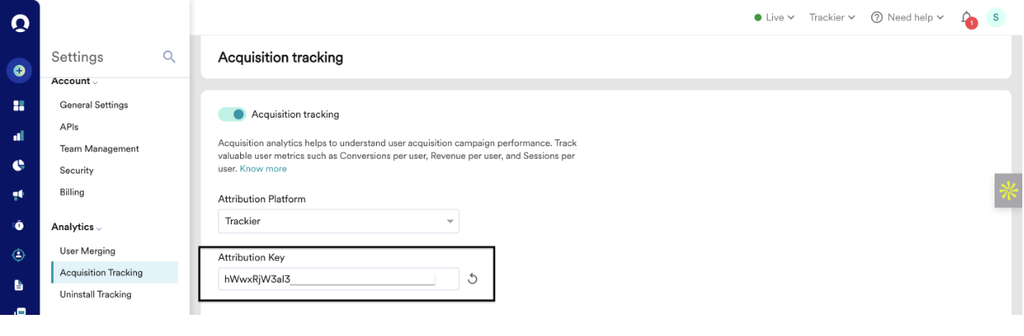
The Attribution Key or App Key is one of the most important credentials required for the MoEngage integration. Get your Attribution Key from the MoEngage account and copy it into the relevant field in Apptrove.
It is crucial to ensure that the app key you are using goes with the app that you are linking.
Workspace ID (App ID)
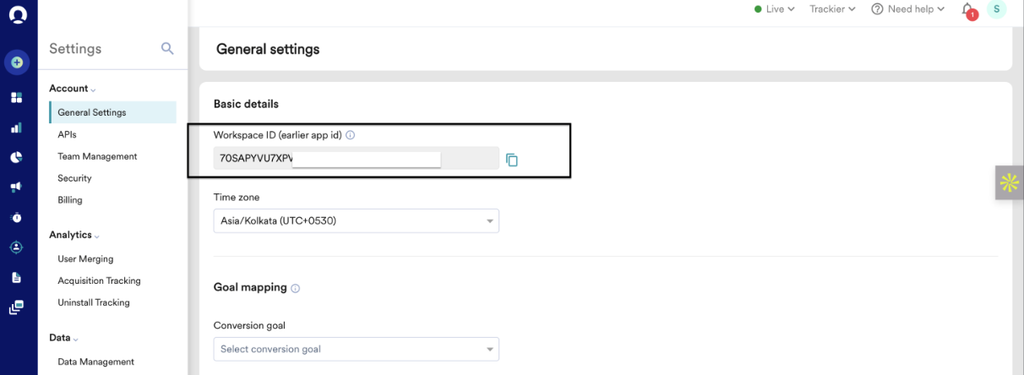
Now, you’ll need your Workspace ID, or App ID.
This identifier is available from your MoEngage account. Please find the Workspace ID for your application and copy it into the proper field in Apptrove.
The correct App ID ensures that the intended MoEngage workspace is used for the connection.
API Key
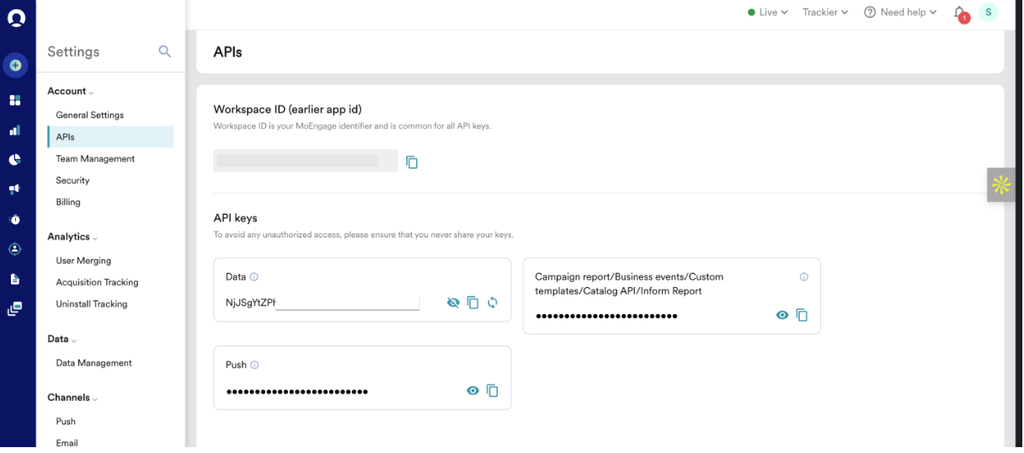
The last credential required here is the API Key.
Get the API Key from your MoEngage account and paste it into the respective field of the Apptrove configuration panel.
The Attribution Key, Workspace ID, and API Key are needed to complete MoEngage configuration integration and should be entered properly at each step.
Make sure you’ve entered all three values safely and correctly before you continue.
Step 3: Default Postback activation
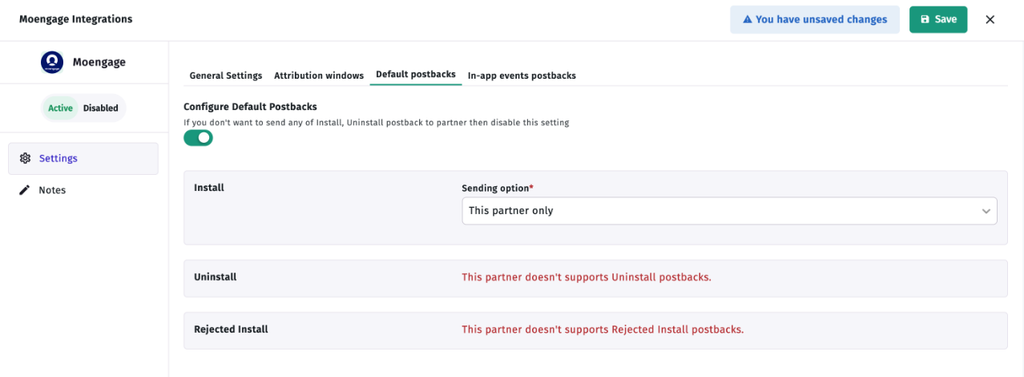
After you have added your MoEngage account credentials, you will now have to define the postback settings. Postbacks would entail Apptrove automatically passing user installation data to MoEngage. This would indicate that the installations are tracked and attributed to your MoEngage account without asking for manual data transfer.
The Default Postback option in integration settings must be activated for this feature to work. When Default Postback is activated, Apptrove is able to automatically send data to MoEngage’s postback system whenever a user installs an app.
Moreover, this option is a vital component of MoEngage integration because it allows for automatic data exchange regarding installations. When the Default Postback feature is activated, the installation data can be sent from Apptrove to MoEngage as soon as users install the app.
Step 4: Keep Your Integration Setting Secured
You need to review the integration setting for MoEngage and to make sure that the following information appears in the configuration process:
- Cross-Device Attribution Key (App Key)
- Workspace ID (App ID)
- API Key
- Default Postback is activated
If everything is entered correctly, just hit the Save button.
How MoEngage Integration Supports Campaign Management
The integration of Apptrove with MoEngage eliminates the need for manual data transfers of installation data. The MoEngage integration facilitates transfer of installation information with the default postback feature.
MoEngage can be used for various customer engagement activities through its capabilities of push notifications, emails, and messaging. Since these modes of communication are behavioral-based, installation data in MoEngage makes the process of campaign planning easier.
This makes it easy for marketing teams to plan their engagement campaigns better as they don’t have to worry about data transfers anymore. The MoEngage integration also simplifies the process of keeping installation data synchronized between the platforms.
Conclusion
Installation of the MoEngage integration with Apptrove is a straightforward process and requires an active MoEngage account, correct credentials, and a Default Postback feature to be used. To complete the setup process, you start by finding MoEngage in the Partners Integration catalog and then provide the Attribution Key, Workspace ID, and API Key.
With the connection configured, teams can focus on customer engagement, campaign strategy, and optimization while maintaining the flow of installation information between Apptrove and MoEngage.