

Gaining insights into user interactions with an app is key to measuring levels of user engagement and improving a product’s user experience. Mixpanel is a tool for product analytics that assists businesses in tracking their users’ actions across websites and apps. It enables the analysis of user behavior by allowing the analysis of several in-app activities and determining user engagement in a product.
The integration of Mixpanel with Apptrove establishes a connection between the two tools, making it easier to retrieve and analyze data regarding events without making use of manual exports. Users can integrate both platforms at once and then keep Apptrove and Mixpanel synchronized without wasting time on constant operations of transferring data from one tool to another.
With this integration, marketing professionals and product teams can focus on gathering insights into user behavior, understanding what happens in-app events, and evaluating patterns of users’ engagement.
How to Configure Mixpanel Integration in Apptrove
In order to connect the two platforms, you will need to access the integration options in Apptrove and input the necessary credentials from your Mixpanel project. Below are the steps to do so.
Step 1: Locate Mixpanel option from the integrations tab
Start by logging into your Apptrove account and proceed to the integrations tab.
Look for the Mixpanel option from the list of various integrations and if you find it, hit the active button to configure the options.
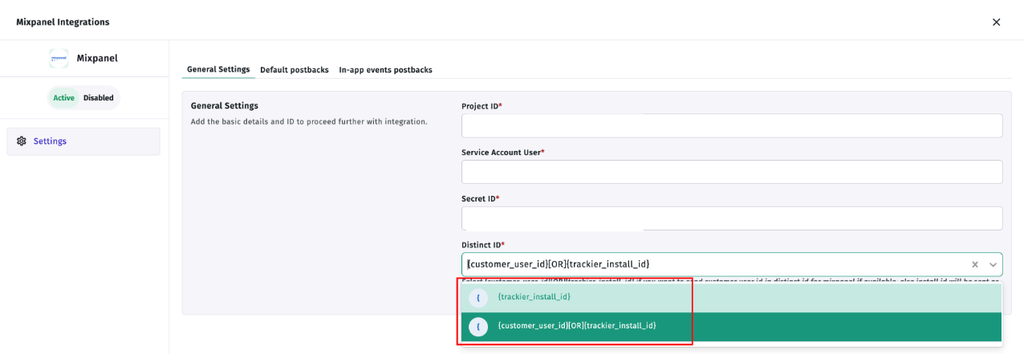
Once you do this, you will be directed to the general settings where you will have to input all necessary information to make a connection. The configuration panel of Mixpanel integration is where the project information and authentication credentials that you have collected from the Mixpanel account will be input.
Step 2: Input your project ID for Mixpanel
The first requirement will be your project ID for Mixpanel which will help connect the Apptrove configuration to the right project in the Mixpanel account.
To find it, log into your Mixpanel account and go to project settings. Look for the project ID that is specific to the project you want to link.
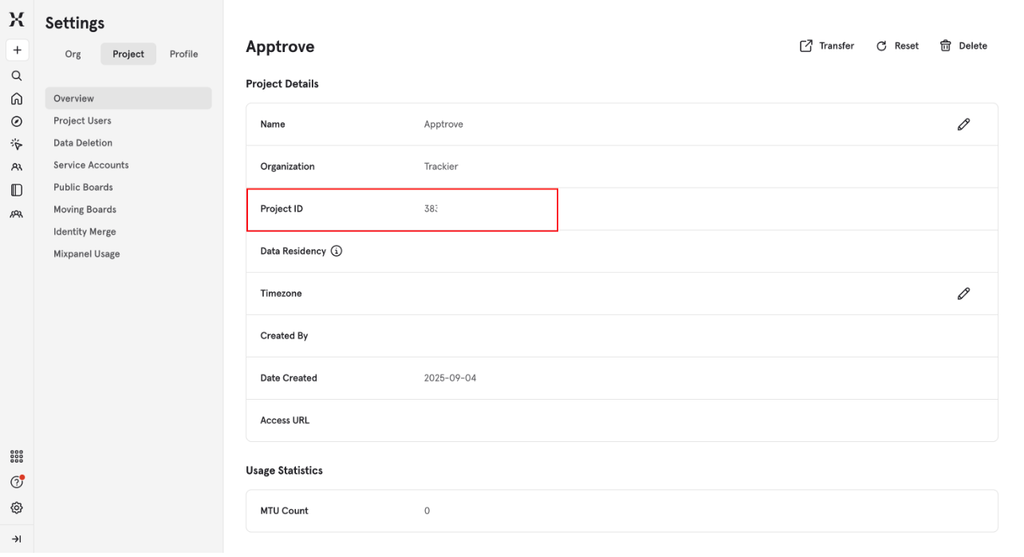
After you have found the ID, copy it and go back to the Apptrove integration settings to input the project ID in the respective field.
Be sure to enter the ID that belongs to the project in Mixpanel, as you can use this information to set up the Mixpanel integration correctly and link the connection with the correct project.
Step 3: Creating a Service Account in Mixpanel
After entering the project ID, you have to create a service account. This account provides you with the credentials needed for Apptrove and Mixpanel integration to work properly.
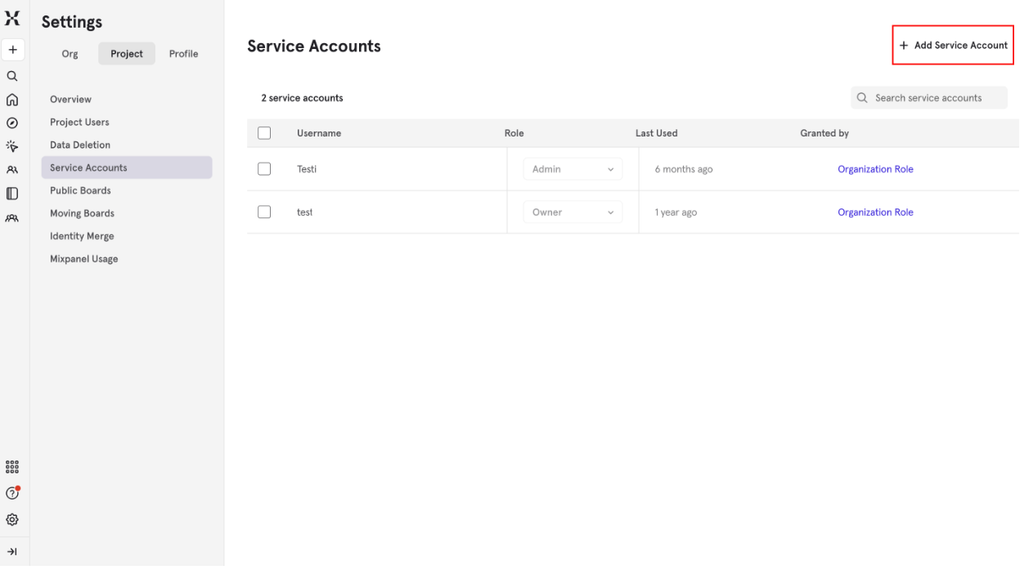
To create such an account, go back to your Mixpanel account and navigate to project settings. Search for service account options in the settings menu.
Use the existing option to create a new service account, and once the account is created, hit the Add button to complete the process.
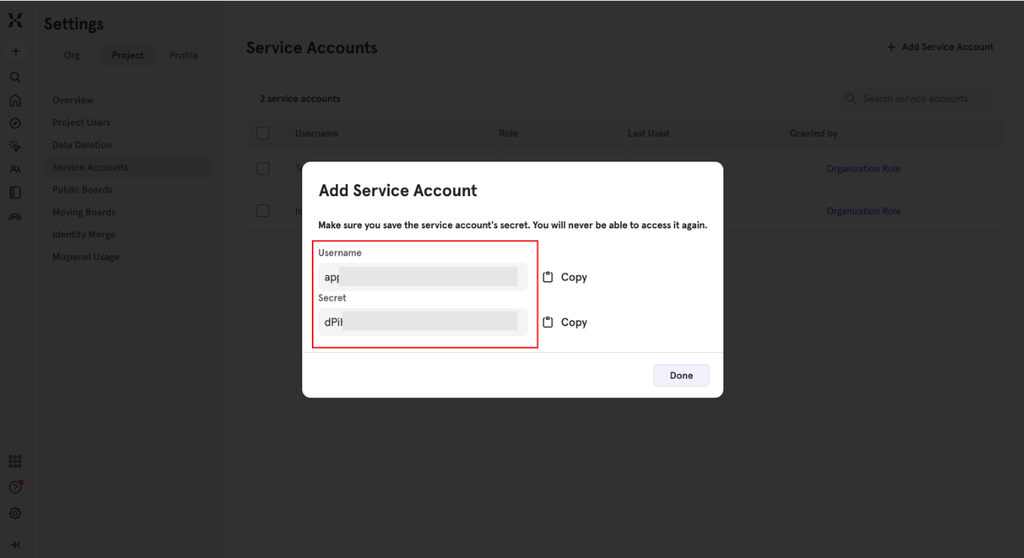
Mixpanel will now give you two essential login details:
- Username: The username generated via the newly made service account.
- Secret ID: The secret key only connected to the service account.
Both this information will be needed for the authentication settings. Make sure to write down the generated username and Secret ID so you can submit them in Apptrove.
Step 4: Fill in the Service Account Credentials in Apptrove
Once you create the service account in Mixpanel, go back to the Apptrove integration dashboard.
Then you will see a form where you need to pick the new username and Secret ID that you have just got in the previous step.
Make sure that you copy both credentials properly so there won’t be any issues with linking the platforms.
Mixpanel integration will use the project ID and service account credentials to finalize its configuration, and once all necessary information is provided, you will be able to proceed to user identification settings.
Understanding the Distinct ID Settings
The use of Distinct ID settings varies with regards to how users are recognized in the event data sent by Apptrove to Mixpanel. In order to determine the identifier assigned to the distinct_id property, Apptrove provides two options for configuring this setting further. The option to use customer_user_id or install_id is provided to configure this setting.
Option 1: {customer_user_id}[OR]{trackier_install_id}
This option gives preference to customer_user_id when it is available.
Whenever customer_user_id is available, Apptrove will use it as the distinct ID when sending data to Mixpanel. In case the customer_id is not known, trackier_install_id is used automatically.
This allows achieving a different identification method without requiring the user to have a customer ID all the time.
For companies that want to use customer-level identification wherever possible while still using install-based identification as a backup option, this would provide them with the needed flexibility.
This selection means that the Mixpanel integration works by the following identification strategy:
- In cases when customer_user_id is present, it will usually be chosen as the unique identifier.
- In cases when customer_user_id is not available, trackier_install_id is to be used. If you choose
Option 2: trackier_install_id
It will always be selected for identifying users. In this case, the system will not check if customer_user_id was there or not.
This option is the best if you are looking for straightforward tracking based on installations. Apptrove will definitely make use of trackier_install_id for user identification in Mixpanel no matter if any other user’s identifiers are present when this option is selected.
Choosing the Right Distinct ID Option
It is very important to pay attention to the two parameters that will determine how users will be identified in Mixpanel. According to the first option, customer_user_id will be chosen if available and it will switch to trackier_install_id if required. If you use the second option, trackier_install_id will be applied for all users which means that the installation number will always be used for user identification.
It is very important to be careful while choosing a setting in your Mixpanel integration configuration. Once you have selected your preferred option, review the configuration details before saving.
Step 5: Save the Configuration and Access Mixpanel
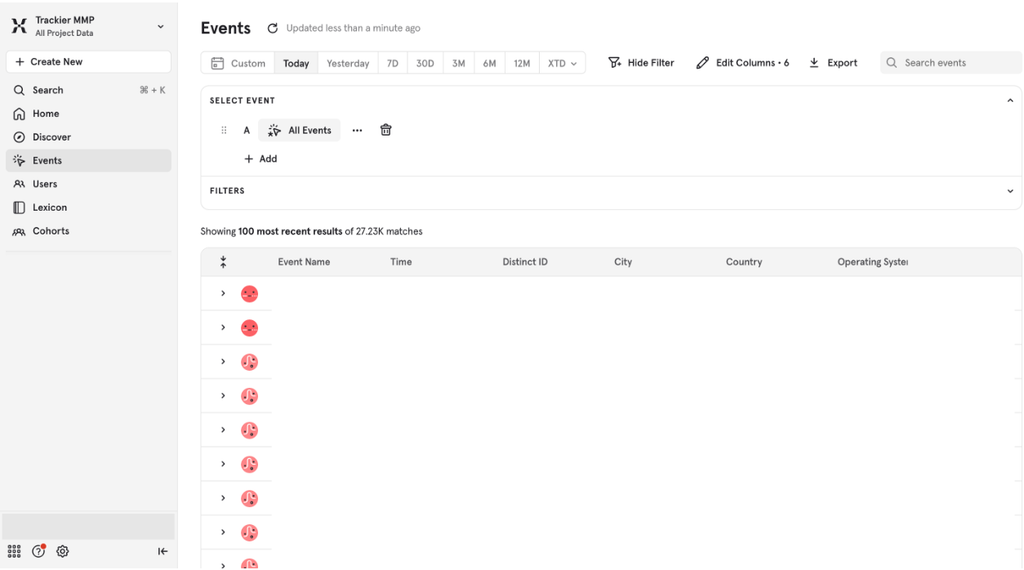
After providing the project ID, service account details, and selecting the appropriate Distinct ID option, proceed to click the Save button in Apptrove. This officially marks the end of the integration process for Mixpanel.
Now, you should be able to access the Mixpanel platform and analyze data that would be provided.
There’s no more hassle of data transfer between the two systems (Mixpanel and any other platform) anymore, hence making it easier to use Mixpanel for your needs and monitor your applications.
With the data now available for viewing, you will be able to make use of Mixpanel reporting tool to analyze user activity based on specific criteria.
Using Mixpanel To Analyze The Data
Once you have integrated Mixpanel, the next step is to use the Mixpanel interface to analyze data.
With Mixpanel, it is possible to create various types of reports that provide information about the user experience. These reports are based on in-app events and allow users to analyze how they have used the application and how their behavior has changed over time.
Creating Funnels and Flow Reports
You can create funnel and flow-based reports that can be used for understanding the in-app events.
These reports provide insight into how users have interacted with the various events in the application. You can create more than one report depending on the types of events you would like to analyze.
Partner-Specific Data Breakdown
Mixpanel also allows you to break down information according to partners. This makes it possible to analyze relationship-related information by using different partner-related perspectives. The information received can then be used to assess how different partners have influenced the performance of the events.
Examining Events Across Date Ranges
Another feature that comes in handy in Mixpanel is the ability to see when certain events are triggered. You can select different date ranges to see the events. In addition, you can check how these periods compare with one another. Funnel report, flow report, and breakdown by partners.
Understanding Apptrove and Mixpanel unique user count differences.
When you examine reports after setting Mixpanel, you may notice that the unique event numbers of Apptrove and Mixpanel differ.
This happens because both platforms use different methods of calculating unique events. In particular, they use different identifiers and criteria for counting the event as unique.
Understanding this difference can help you compare the reports of both platforms more accurately.
How Apptrove determines unique events
In Apptrove, the unique event count is determined by a combination of three identifiers:
- Day
- Install ID
- Event ID
This indicates that the computation takes into account the specific day of the event occurrence, the install identification which shows who is responsible for the behavior and the name of the event.
For instance, when a user performs the activity on two different occasions, the count of performance of the same event will be two occurrences.
The explanation is in the fact that the activity is known for many different times from the time it took place. The change of the day brings a new identification which will be counted as a separate event
To Wrap It Up
Overall, Apptrove with the Mixpanel integration simplifies product analytics work, so you will not need to deal with any type of manual export as long as you can specify something as simple as project ID, set up service account, and select Distinct ID type.
After the connection has been established, it becomes possible to generate the cohorts and flow reports and segment the data according to partners, monitor the in-app events, and compare results from different time periods.
Also, it is crucial to learn how each of these systems performs their unique event calculation. Apptrove generates its unique count according to the day/date, install ID, and event ID, while Mixpanel works with the existing distinct ID only, which is why their unique numbers are different.