Using smart banners is an effective way to acquire app installs from website traffic without disrupting the user experience. Thus, instead of requiring users to search for the app themselves, a smart banner simply directs them to the desired location.
The smart banner functions regardless of whether the app has been installed, helping the user find their destination accurately while monitoring all necessary statistics for attribution and campaign tracking.
What is a Smart Banner?
A smart banner can be described as a web-to-app engagement platform that becomes visible on a particular website, encouraging visitors to download or open the mobile site.
When a person clicks on the smart banner, their experience will depend on whether the app has been installed:
- If they have installed the app, they will be directed to a specific location via deep linking.
- Otherwise, the app will download successfully, taking the customers to the right app store.
- If deep linking is unavailable, fallback URLs will redirect users to their destination as expected.
- This device makes the experience as smooth as possible, allowing proper attribution at all times.
What Does a Smart Banner Track?
The smart banner keeps track of three important performance measures by default, which include: impressions, clicks and installs.
Impressions
An impression is counted every time the banner loads on the website.
Clicks
A click happens when a user clicks on the smart banner.
Installs
An install is counted when the user clicks on a smart banner and installs the app.
The results can be utilized to measure the success of the campaign.
Example of Smart Banner usage
For instance, you run a business of food delivery, grocery delivery, or a service marketplace.
Many people check your website using their mobile phone without having the app downloaded. The banner takes care of this dilemma and provides them with a quick call to download the app from the App Store or open the app directly if installed already.
Thanks to UniLink’s technology, the smart banner determines where to send visitors and makes the process easier.
Smart Banner Setup Flow
Before creating your smart banner, ensure that you have at least one UniLink template in place.
The efficient approach is to follow the given structure:
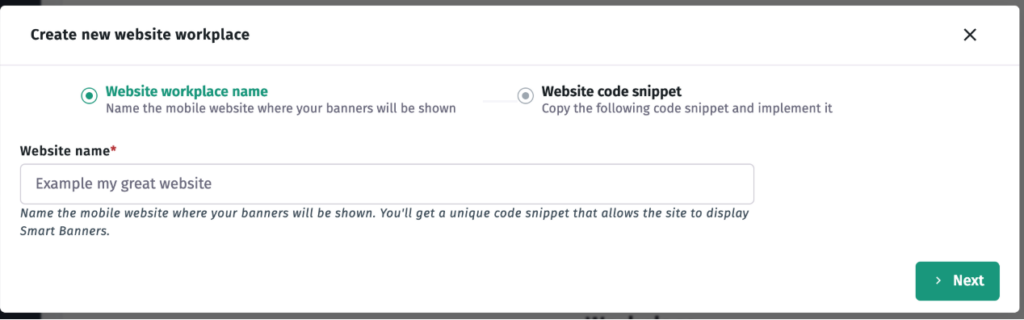
Website Workspace → Group of Banners → Banner (Creative/Template)
This method allows users to manage their campaigns well and makes banner management easier in the future.
What does the smart banner depend on UniLink?
Every smart banner behaviour is based on the chosen UniLink configuration.
This means that the smart banner follows the same rules regarding:
- Deep linking
- Deferred deep linking and
- Redirecting, etc.
Consequently, by clicking the banner, you will receive the same routing experience as when you click the UniLink.
Build the website workspace
The first step to creating your smart banner is to build the workspace for the website where the banner will appear.
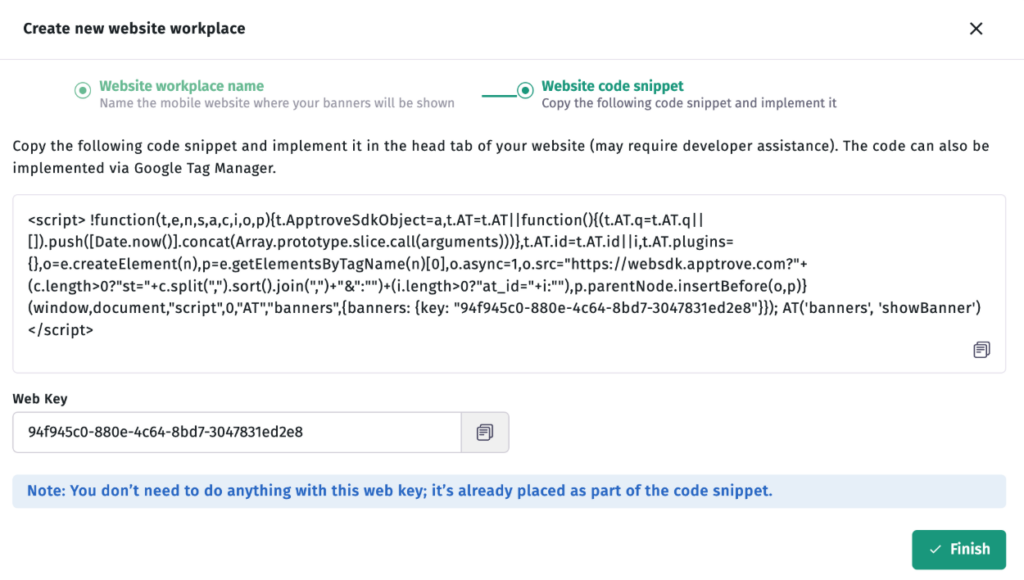
The construction of a workspace means that the platform provides you with a code snippet to be implemented in the website’s HTML directly or through Google Tag Manager (GTM).
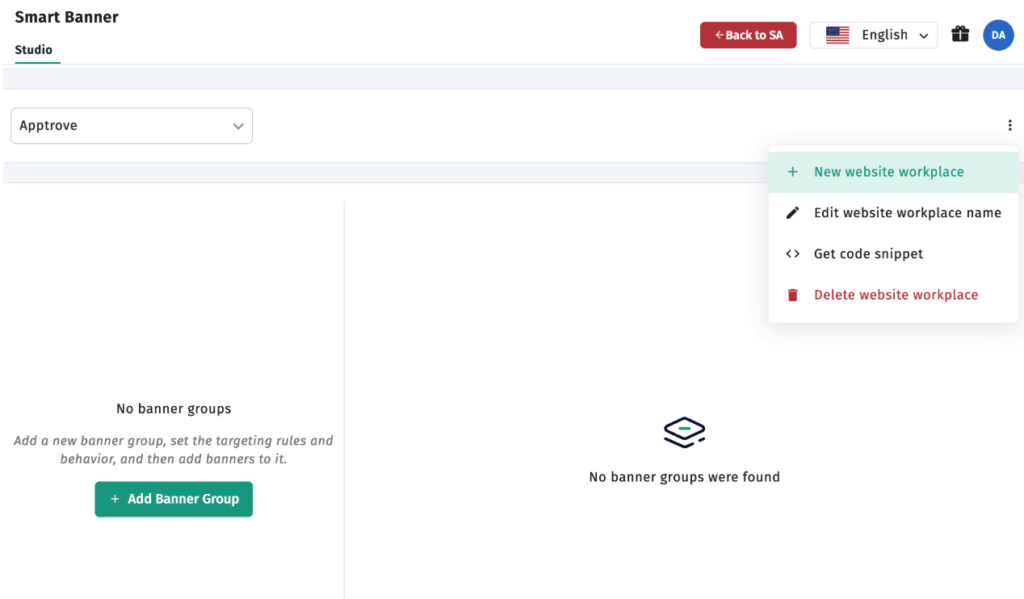
In case you’re running multiple websites, you can build as many workspaces as you require within the Studio section.
Create a Banner Group
A banner group is a collection of multiple creatives under one UniLink template.
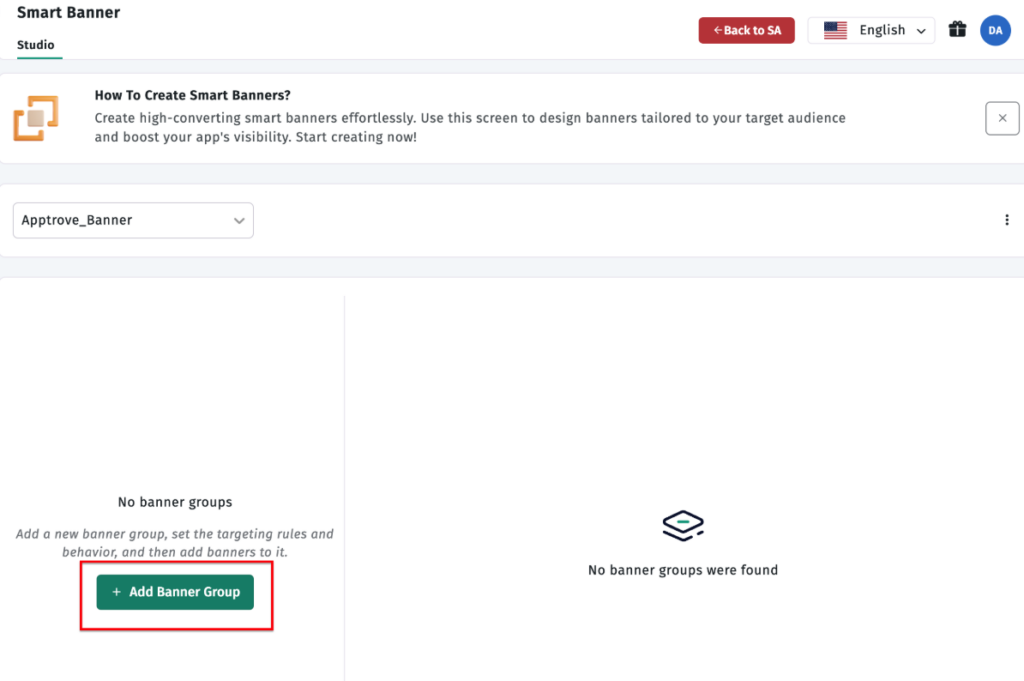
Here’s how to set one up:
- Go to your workspace.
- On the workspace toolbar, click on Add Banner Group.
- Enter the name of the banner group.
- Select the required UniLink template.
The selected UniLink will act as the routing engine for all the smart banners within the group.
Set up the URI Scheme
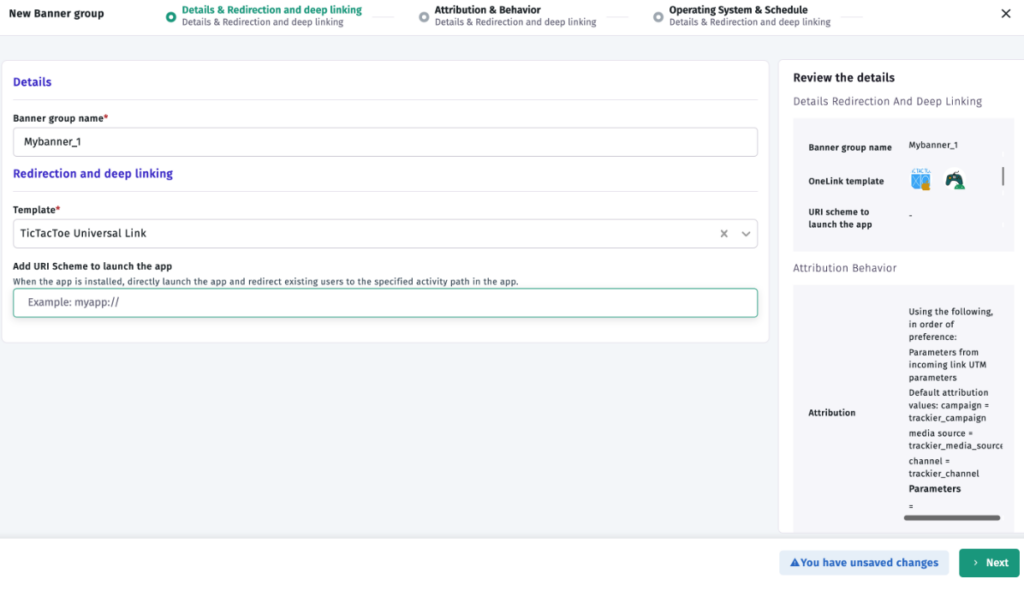
A URI scheme should be configured to be used as a fallback for users when Universal Links or Android App Links are not available.
This allows seamless redirection from different devices and systems.
Set up the Attribution Sources
The banner permits defining both primary and fallback attribution sources for installs made through the banner group.
This can be done in the following way.
Incoming attribution parameters
If the incoming Apptrove attribution link has a PID parameter, then all its attribution parameters will be automatically passed to the smart banner.
UTM parameters
If the incoming link contains the UTM_source parameter, UTM_source and UTM_campaign will also be appended automatically to the banner link.
Additional attribution parameters
You may manually add additional attribution parameters to the banner for better tracking.
Enable Retargeting
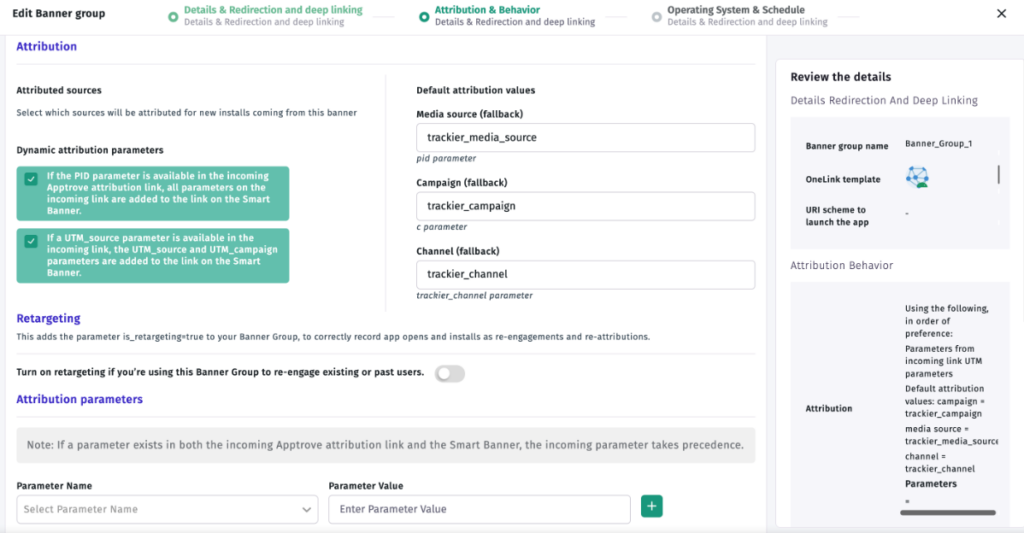
Engage Retargeting when the smart billboard is to be used for re-engagement with previously using clients returning to mobile application after clicking the banner.
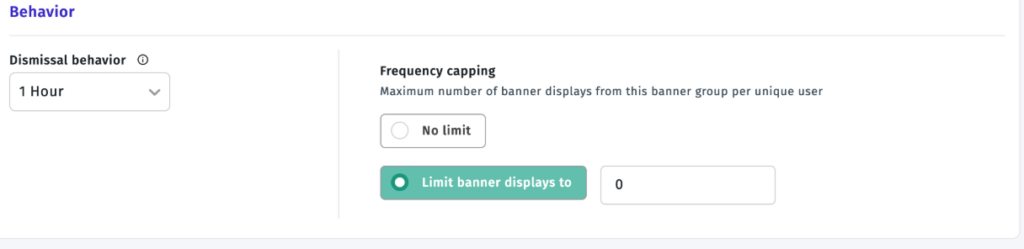
Set Smart Banner Behavior
Banner settings explain the number of times people will come across the smart banner.
Timing out
Decide how much time must pass before a user who has exited the smart banner gets to see it again.
This contributes to lowering the repetitions of the banner.
Limits on appearances
Establish the number of times one person can view the smart banner.
Limits prevent banner fatigue without compromising the efficiency of advertising.
Identify Target Devices and Period of the Campaign
Choose the operating systems for the banner to function.
The users you can target are:
- Android
- iOS
- Both of them
Also create a schedule for the campaign:
- Add the starting date
- Add the ending date
- Make the banner run endlessly
This enables management of the campaign.
Configure Location Targeting
Settings regarding location decide where the banner should be displayed. You can select All Countries to show the banner in all countries or aim at particular areas. If necessary, prevent a few countries, states, and areas from seeing the smart banner.
Choosing a Particular Place means that you can show the banner only to people living in a certain geographical unit. Specify where the smart banner should be presented.
Determine exactly where the smart banner can appear.
To Show on All Pages
In order to demonstrate the banner on all pages of the website.
To Show on Selected Pages
You can specify the host of the site and the path of the page with the help of any URL.
For example,
http://www.example.com/path?query
Only the host and path specified in your message will be checked. Path and query of URL. In addition, the rules can be set for the usage of the path and query of the URL.
For example:
path? query
This makes it easier, such as the virtually definite part of the site of your website. Users are determined by the path and query of URLs.
Add Attribution Parameters
You have the option to add unique attribution details like:
- Ad Group
- Advertisement
- Parameters specific to the campaign
This enhances the quality of reporting and analysis of the campaign.
Select a Banner Layout
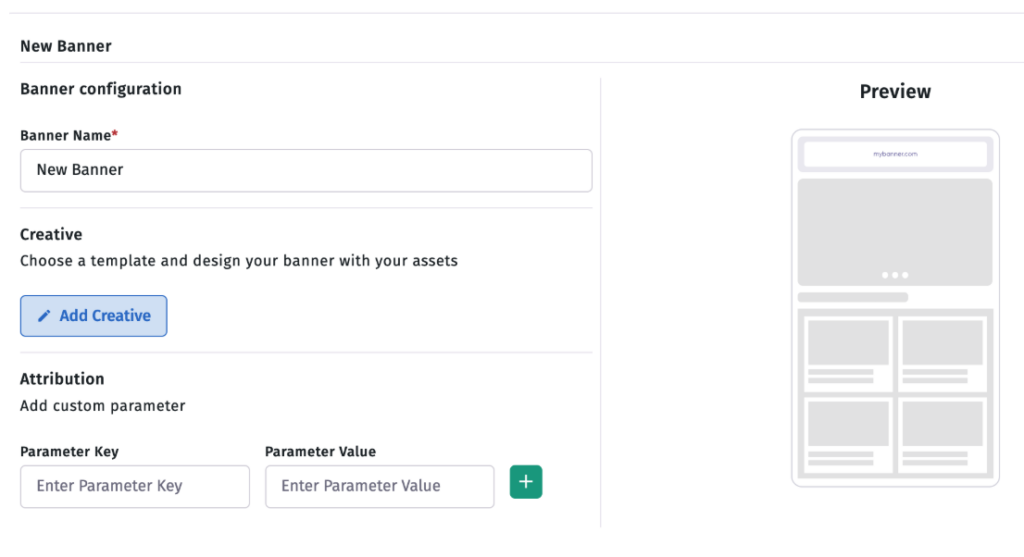
Choose a design that fits your website’s identity, look, and theme. A suitable design allows your banner to merge well into your website without being ignored.
Personalise Banner Components
Each smart ad can be made unique by changing:
- App logo
- Heading of the banner
- Text
- Testimonials
- Stars
- Exit button
- Information required for action
- Look of background]
- Distance around the banner
- Location of the banner
These personalization features support brand identity and help in raising users’ interest.
Save and Publish Your Smart Banner
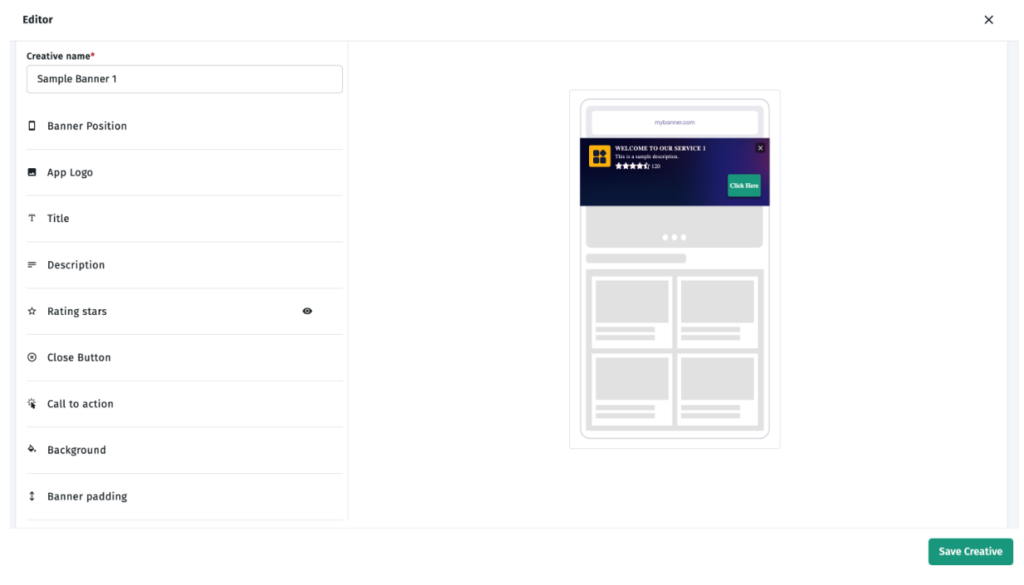
Once you complete the process of personalization and configuration, press the Save Creative button. Your banner can now be launched on your site and begin to count impressions, clicks, and installations, as well as keep track of user interactions automatically.
When the right target, attribution, and personalization techniques are applied, a smart banner becomes an effective instrument that connects your website with your app while ensuring a better experience for users and increased adoption of the application.