The first step a user must complete in order to use Apptrove for the first time is to register their app and allow the app to begin integration with Apptrove’s Services through proper setup configuration. In general, app integrations help manage and track the app’s true use on the Apptrove Dashboard. The right app distributed will allow the SDK to accurately track app metrics and events as they happen.
New App Creation
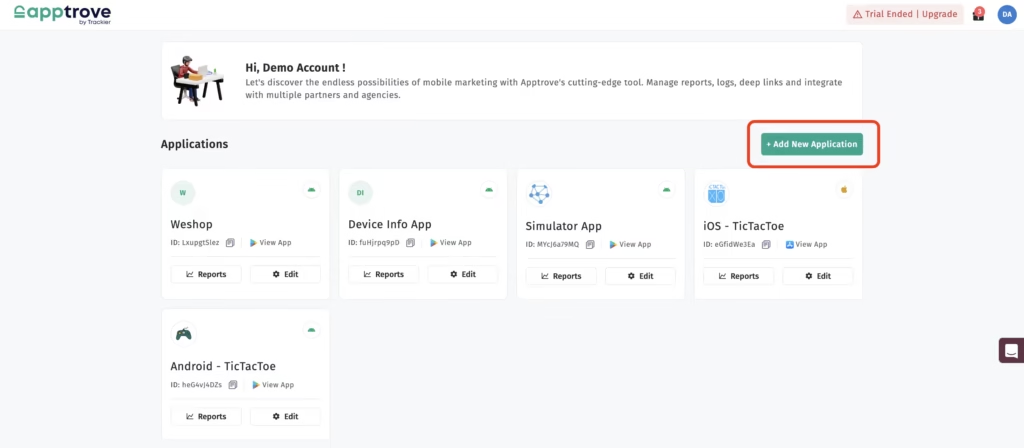
After logging into the dashboard for the first time, the first task to be accomplished is the selection of “Add New App.” This step allows you to create the app record within Apptrove’s system, and by completing this step, you will begin establishing the structure needed to subsequently configure the app and load the SDK into your application.
Application URL Entry
Upon entry of the application URL into the system after the “Add New Application” step, it is necessary to select the app status that corresponds to the app; unique app statuses must be created for each app and will assist you in both properly using and implementing the DRM SDK in conjunction with your application’s current state.
Application Status Options
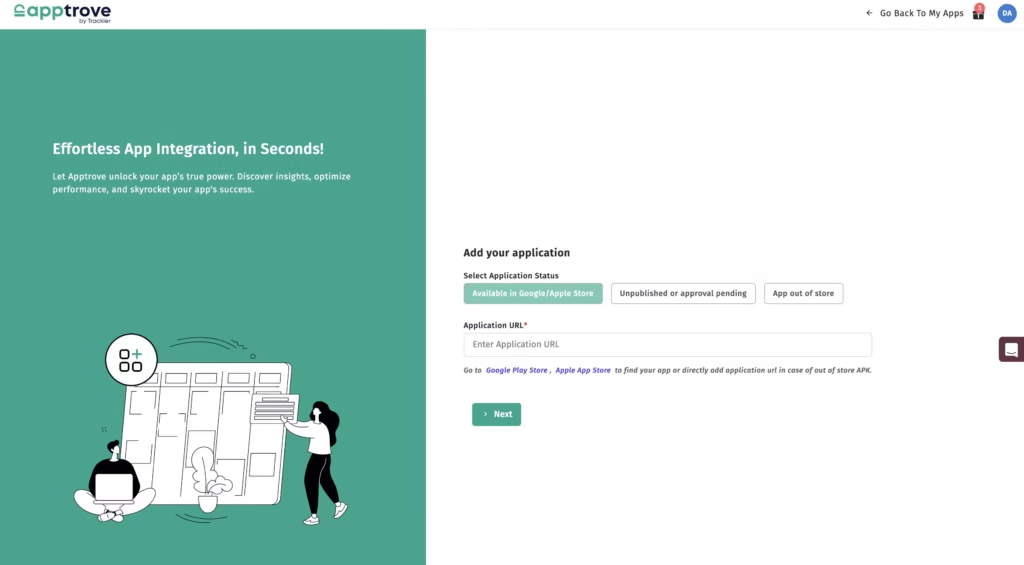
Available in the Google Play Store/App Store:
This option is to be used if the app is live, has been published and is available for users to download from anywhere.
Unpublished or Pending Approval:
This option is to be used if the app is in development, not available for public download and is not yet approved as an app store.
Android Outside the Store APK:
Use this option if the app will be available for everyone but will be distributed on an external website using an APK file.
Once the status has been selected, the user must enter the app URL. This URL can be copied from the app store directly, or if an APK link is required, it will need to be listed as a direct link. If these URLs are input correctly into the SDK when referencing the app source, the app will be able to communicate with the SDK correctly.
Step 3: Input the app information.
Here, you will add the completed information that is necessary for the correct setup of the app. These entries will provide the SDK with the framework to properly organize and translate the app’s data accordingly.
Operating System
Please select the operating system that this app supports, e.g. Android, iOS, or Windows. This is required in order to provide the SDK with the right environment to work with the app.
Name of the application
Please input the exact name of the application as it is printed. This will ensure that the application is clearly identifiable within the dashboard.
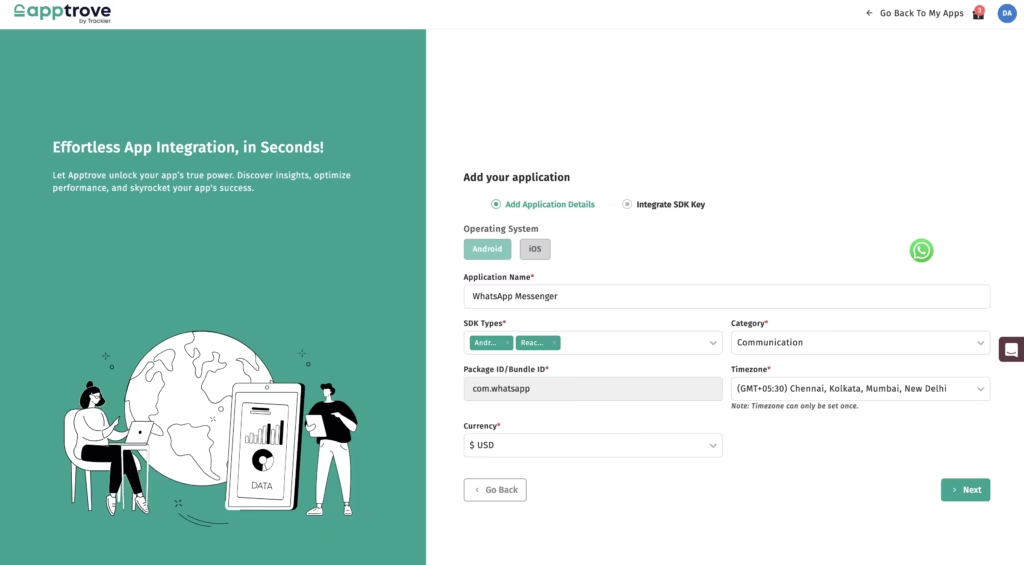
Category
Please select the category of the App that best describes the function of the App (e.g. Education). Categorizing the app will help the SDK collect data.
Package Name / Bundle ID
By entering the application URL, the system identifies the package name or bundle ID so that the effort involved in manually entering this information is reduced, and the software development kit connects data to the correct application.
Providing values for the currency and timezone based on operational preferences provides the software development kit with the regional parameters needed for accurate alignment of reporting and tracking.
Step 4: SDK Integration
The last step is to integrate the secret key associated with the account. Connecting the application to the SDK enables the SDK to track the application directly.
Instructions provided to users show where and how to place the code within the application to correspond to specific events and trigger points. If proper integration is done, the SDK will capture metrics and user interactions accurately.
Importance of Accurate Configuration
Every element of the process is important in creating an effective SDK. By ensuring that the correct application status is selected and that all information is entered accurately, all input is guaranteed to result in reliable tracking and organization of data and the system.
Selecting the correct status allows the SDK to understand whether the application is published, pending publication, or has been distributed externally, which will ensure accuracy in tracking as the application goes through its lifecycle.
Correctly entering your URL allows the software development kit to properly associate your app with its source. This prevents discrepancies in the data recorded by the SDK and provides consistency for the recorded metrics.
Structured detail entry (OS, category of app, etc.) assists with how the SDK is able to organize and categorize metrics within the dashboard. Auto-detecting the package name or bundle ID helps minimize errors and ensures that the SDK is able to map events to the correct app identity.
To Wrap it UP
Completing the setup process will put the SDK into operation and begin recording events and metrics based on the implemented code and defined triggers. By properly completing your setup, you can avoid any data gaps and have all your tracking functions work as expected. Reviewing each of your entries before moving forward will assist with maintaining precision throughout the configuration process.
Consistency in your setup will allow the dashboard to remain properly structured and aligned with the app structure. Using a structured process also allows the SDK to provide consistent tracking and reporting over time. By carefully following these steps, users will be able to ensure they have added their application to Apptrove correctly, configured it correctly, and integrated it into Apptrove. This creates a solid foundation for monitoring the performance of the application and analyzing how the application is being used through the use of the SDK.

We are delighted to have assembled a world-class team of experienced professionals who are ready to take care of your queries and answer any questions you may have. Feel free to reach out to us at any time by emailing us at support@apptrove.com or by using the in-platform chat feature. We’d love to hear from you!